This is the multi-page printable view of this section. Click here to print.
PoLo Features
- 1: Home Screen
- 2: Operations/QSO List Panel
- 3: Operation Templates
- 4: Logger Settings
- 5: Band and Modes
- 6: Online and Offline and FAQ
- 7: Data Lookups
- 8: Spotting
- 9: Mapping Requirements and FAQ
- 10: Operations with more than one Operator
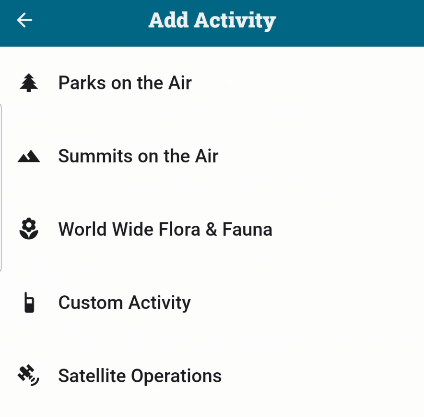
- 11: Satellite Operations
- 12: Callsign Expansion
- 13: Callsign Stacking
- 14: Callsign Notes
- 15: Emojis
- 16: Export Templates
- 17: Developer Mode
- 18: Log Exports & Privacy
- 19: Tips and Tricks
1 - Home Screen
PoLo opens on the Operations Summary page. A list of your operations are presented to you with your callsign, activity code/ID number, the name of the location, the number of QSOs in the activity so far and the date of the operation. The number of QSOs shown top right of the Operation band is the number of QSOs not including any QSOs marked as deleted.
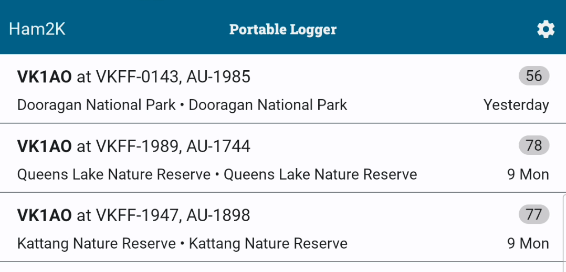
At the bottom of the Operations Summary is a Quick Call Lookup and Spots link.
Quick Callsign Lookup
Enter a callsign in the lookup area and the lookup data will display including any Callsign Notes you have present for the callsign. Tap the panel to open the full QRZ callsign lookup.

Spots
Tap the hamburger icon to open the Spots page. This can be handy for checking spots when not in a specific operation. Unlike the action available during an operation, tapping a spot on this view will not enter the details to start logging a QSO. You need to be in an operation for this action to apply.
Opening an Operation
Tap on an operation band to open the Operation for editing. See Operations/QSO List Panel for information on entering QSOs.
2 - Operations/QSO List Panel
In the full version of PoLo, the top of the panel is demarcated by 4 tabs - QSOs, SPOTS, MAP and OPERATION

QSOs
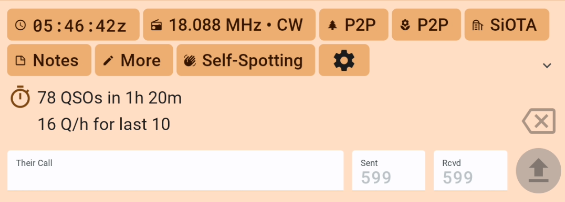
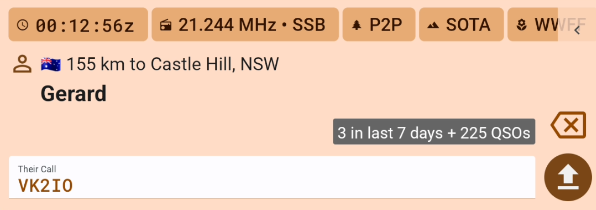
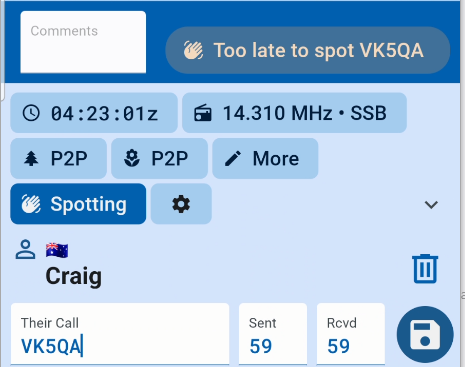
The PoLo QSOs List is where you will interact with the application once you’ve set up your operation. Once your frequency and mode have been entered (which may have been picked up from your previous operation) the left pointing (or less than) arrow expands the operations panel to show all available interactions. Tapping the Controls (settings) wheel will reveal any that are available, but not set with the operation. This might be useful when a caller from an unexpected award system such as UKBOTA or SiOTA call you. Selecting them from the More Controls section will make them available for use within the Active Controls. Once the selection is complete back out of the Controls section by tapping the Controls wheel.
Tapping an Active Control will provide the appropriate fields for information to be entered, eg P2P will enable park details to be entered in addition to the contact details. The Notes control is for per contact information to be added, and the More Control displays all information stored for the QSO.
The Callsign/Operation Information Panel can show various pieces of information dependant on your installation and circumstances.
- If you entered a qrz.com account in PoLo settings then the name and location held for your contact will be displayed.
- If you subscribe to qrz.com then their bearing and distance will also be displayed (assuming your contact has location details set at qrz.com)
- You should also see a country flag, and occasionally an emoji, that contact is in the Ham2K Hams of Note list. The meaning for these is covered in the emojis area of the manual.
- If you’ve worked a station previously then the number of contacts and time period will be displayed.
Once QSO details are entered, tapping the up arrow will save them into the operation log. Tapping that QSO or an other within the operation log will bring the details into the Callsign Information Panel where you can change them and save them by tapping the save icon, or delete the QSO with the trash can icon, which will need to be tapped twice before the QSO is lined through in the operation log. A deleted QSO can be recovered by tapping it in the operation log, then tapping the undo arrow, and saving.
SPOTS
Tapping on the SPOTS tab will shift the view to the current spots which will be filtered according to your previous settings. Tapping a spot will pre-fill the QSO entry panel with the information from the spot you tapped. QSOs can be entered this way without chaging the frequency or band previously set in the QSO panel. When the QSo is saved, the previous settings return as active.
MAP
Tapping on the MAP tab will shift the view to the QSO map for the current Operation. More information on Mapping can be found elsewhere in this manual.
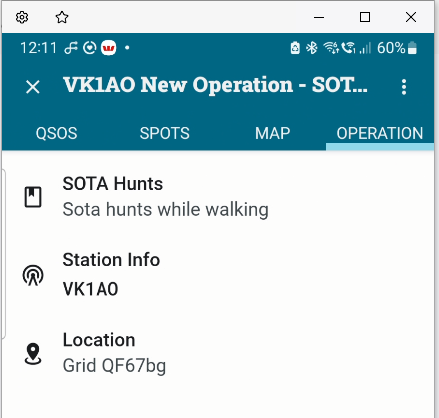
OPERATION
Finally, the OPERATION tab provides access to the settings such as your location, the activities attached to the operation and the features associated with exporting the operation logs ready for upload to 3rd party websites and your own home logging system if desired.
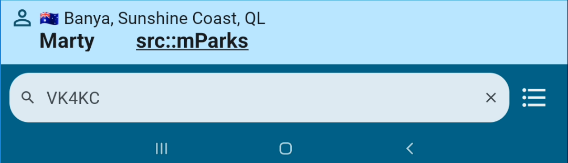
Callsign Lookups
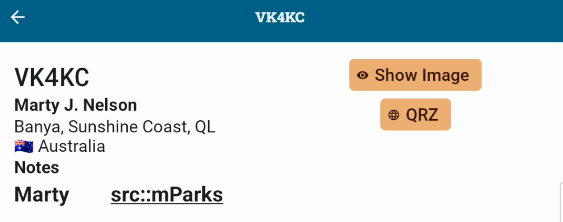
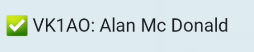
Tapping on the area above the callsign entry field will open the QRZ lookup for the callsign in focus. This provides further lookup data and the callsign Operator’s QRZ default image. It also summarises contact history for that callsign.
QRZ images
The QRZ lookup panel which displays the callsign’s name and QTH details, also displays the default image from theoperator’s QRZ page. This image is displayed by default, but can be turned off if your bandwidth is insufficient or you consider it unnecessary.
Tap the eye icon onb the bottom left corner of the image to make it disappear. This setting is sticky and will prevent future retrievals of all such images from QRZ. To turn image retrieval back on, tap the “Show Image” button to bring them back for future lookups.
Operation Stats
Tapping on the QSO summary bar will display the operation summary which contains a summary of bands, modes, DXCC entities and activity such as park2Park contacts for the programs being activated.
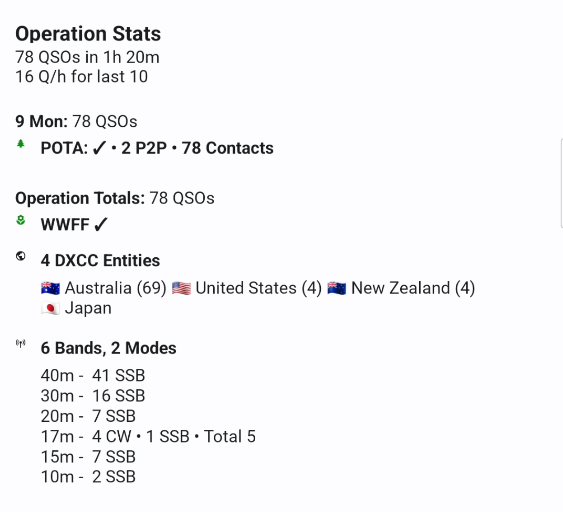
It is also possible to access the Operation Stats by tapping on the Operation Information area.
When no callsign is present in the “Their Call” field.
3 - Operation Templates
We tend to keep doing the same sorts of portable operations/activities. PoLo will recognise the pattern and offer a template for your next new Operation base on prior behaviour. The templates in the offering below show the most popular operations. Selecting one will save a few taps when creating a new one.
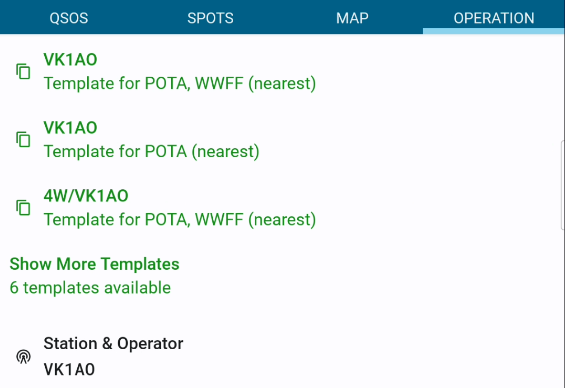
Tapping on the first template above, will create an operation for VK1AO and add a single POTA park and a single WWFF park. Assuming a GPS location has been obtained or set, both these added parks will be populated from the offline parks list. The parks added will be selected from the parks nearest to the currently set location.
Sometimes the park location and your location does not reflect the exact park you are in but this can easily be changed. Often, however, the selection is done for you and saves a few more taps and keying to set the operation up.
If you popularly operate as 2 or 3 operators in a group, the template will show the callsigns of all the operators and save keying them in to begin.
4 - Logger Settings
PoLo’s settings are found behind the settings cog icon on the top of the operations list screen

PoLo application Settings may include Developer Settings if Developer Mode is activated. Developer Settings are highlighted in orange.
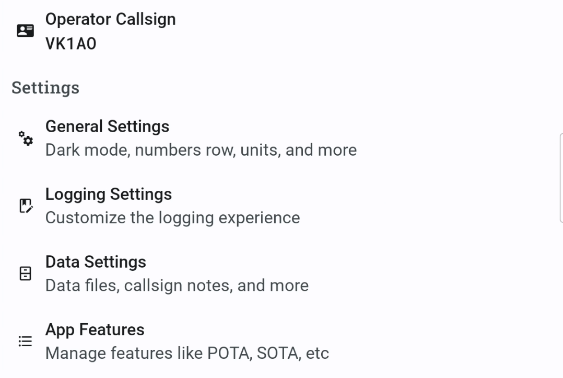
You should first set your Operator’s Callsign.
Then you should open each category and choose your preferred operating environment.
General Settings
The list of general settings avilable to your operating style should be self explanatory. The export settings are dealt with in more details in the Log Exports & Privacy section.
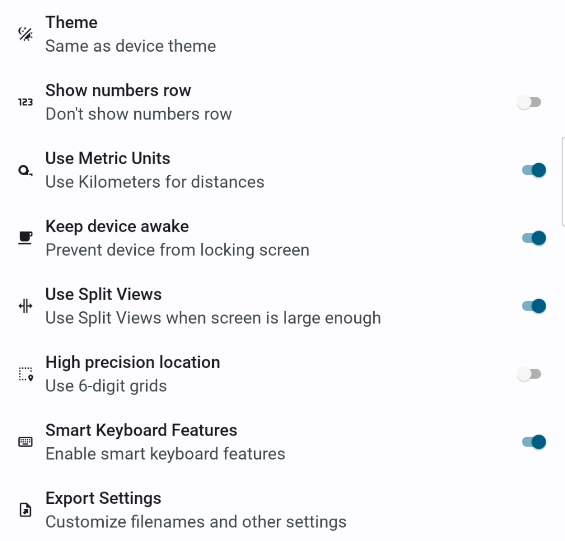
Refer also to Privacy and Export settings for enabling data and app usage sharing.
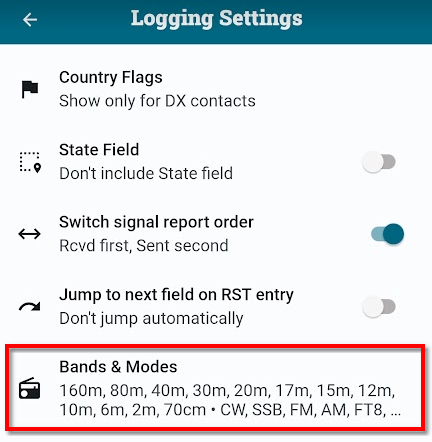
Logging Settings
Logging settings refer to how you like to enter your data in the QSO entry screen and what additional information is shown in the QSO list. You may be left-handed, in which case the send button will appear on the left side of the entry fields. You may wish to see country flags only for DX stations, not your own. You may not wish to collect or see the State field. You may wish to record signal reports as Sent first or Received first. You may like to see a bearing to the other station (requires gridsquare/paid QRZ account) You may like the field entries to jump automatically to the next field during entry. Finally, you may activate/enable more or less bands and modes to enlarge or shorten the band or mode drop down lists in the QSO entry form. A separate section is found here on Bands and Modes.
Data Settings
PoLo relies on certain offline data files which are refreshed when the application is started up. Data files can also be refreshed manually if required. Depending on your chosen supported acvtivity, different offline Data files will be listed. It is also possible to install your own offline data file. An ADIF file of contacts/log can be imported and used during QSO entry to obtain names and locations. And finally , you may install your own Callsign Notes file as an extention to the default file. The format for this lookup file is explained on the Callsign Notes page amd also elsewhere in this manual.
Sync Settings
Sycn settings refer to a feature which will be available as a 2-way service at esome time in the future. At this time, it is a 1-way service sending your data to the Ham2k LoFi Server. This may be used to investigate application/data issues.
App Features
App Features comprise Location-based Activities, Contests & Field Ops, Data Lookup sources and other logging features such as Satellite Operations and Worked All Britain.Ireland squares. There are several sources for callsign lookups which are free, including HamDB, HamQTH. Some services are more comprehensive than others. It’s your choice, activate the one(s) you prefer. If you have enabled Developer Mode, you may also notice that it is possible to spot to a Discord server if you find this useful.
Developer Settings
These settings, if enabled, allow you to select the update track for the application, e.g. new features updates. It also allows you to import a QSON file which has been exported from another device. A QSON file is a single distinct operation which can be transported bewteen devices. It contains enaough information to generated a new ADIF export and it will merge into your existing operations list. Refer to Developer Mode for more information.
Accounts
QRZ
The most popular account to be used with any logging application is QRZ. Refer to Data Lookups for more information on setup and use of QRZ accounts.
SOTA (for SOTAWatch self Spotting)
If you are a SOTA activator, then you have an account with SOTAWatch. An account is not required for chasing SOTA activators. You are only required to activate the App Feature (see above). But to Spot yourself on SOTAWatch, you must have an account and have it active in PoLo. The SOTAWatch authentication system relies on an initial loging to acquire a token. The token can be refreshed but may expire if not refreshed regularly. In this case, a fresh login is required to acquire a new token. When the text “Logged in as”.. CALLSIGN is displayed, the token is current. When the token has expired, the text will display CALLSIGN only. Tapping the account will attempt to refresh the token. If a token refresh is not possible, you will be prompted to make a new login to activate the connection again. The authentication interface will remember your credentials for future login requirements.
Other accounts may be listed in this section when and if they are available or required. If SOTA is not an activity that you engage with, deactivating the SOTA activity in the App Features section, will remove SOTA from the accounts section.

QSO entry settings (Logging Settings)
From the elipsis button on the Operations QSO List panel, there are several options/actions that apply to the QSOs in the list.
Entry Field visibility
Some operators choose not record RST values at all. Some operations do not require the excahnge at all. For these instances, you can choose to switch RST Fields off. When off, the RST fields are not visible in the QSO list, nor are they visible in the QSO entry panel. In this case, a default value is recorded for each QSO.
State Fields
Many jurisdications around the world pay little attention to a State exchange during the contact. For those operations, the State fields can be turned off. It will not be shown in the QSO list, nor will it be seen in the QSO entry form.
Show Deleted QSOs
Normally when QSOs are deleted, they are visibly present in the QSO list but are shown as a line-thru QSO. QSO’s so deleted, can be edited and un-deleted at any time. The Show Deleted QSOs option can be turned OFF so deleted QSOs are not shown in the list at all. Deleted QSOs are also not part of any QSO count or operation statistics.
Numbers Row
For some devices and some keyboards, the number row is not available or visible. Turning this option on will place a PoLo numbers row across the top of your existing keyboard.
Lookup All
You may not have cell coverage during your operation and thus no ability to lookup callsigns. In these cases, you may be using a callsign notes or callsign history adif file for offline lookups. When you return to a cell coverage area or when the coverage improves, this option will force a lookup of all QSOs in your QSO list.
Confirm Spots
While spots are available, and you think you may have entered callsign(s) incorrectly. This option will run through the spots list and compare your QSOs against the visible references and callsigns you have. Corrections may be applied to your QSOs. If spots for your QSOs have expired and are not present in the list, this action has no effect.
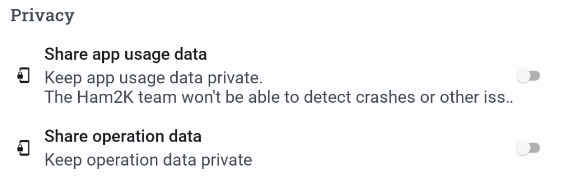
General Settings - Privacy
The application provides a way for users to share usage data including app crashes. There is also the ability to share operation data if you wish to or consider it importatnt to do so when tracking down a system bug. These settings can be enabled or disabled at any time.
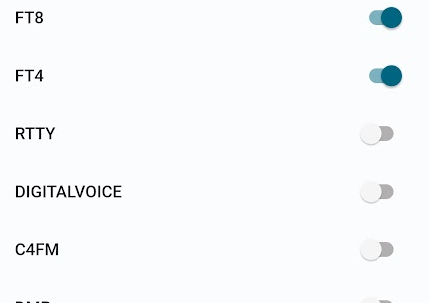
5 - Band and Modes
Select the Bands and Modes you operate on
All frequency bands and modes that PoLo supports are made available for use from Settings > Logging Settings > Bands & Modes. Initially the common bands and modes are available, this can be changed to all bands, and all modes by tapping ‘Show all bands’ or ‘Show more modes’ at the bottom of each section.
Once you have access to the band or mode you’re searching for enable it by using its switch. Backing out of that page to the Logging Settings page will show you the bands and modes available to be used in a new operation.
Enabling other modes and bands
The list of the most popular modes and bands are enabled by default. There are numerous other bands and modes available and can be enabled by the user.
To enable more Bands or Modes, first select Logging Settings then click Bands and Modes. The currently available bands and modes are listed on the next screen which allows for more to be enabled by clicking the slider controls. Still more bands and modes are available behind the Show all bands or Show more modes item.
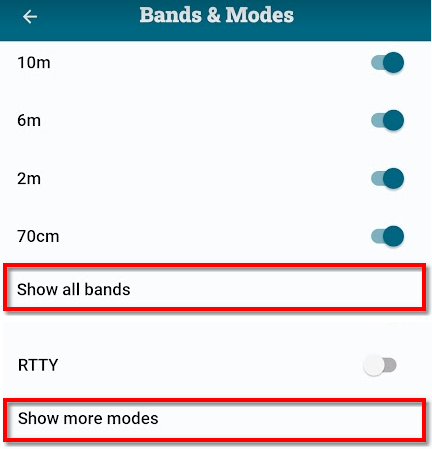
Once open, the Bands & Modes page will show even more bands or modes. Enable the bands or modes desired using the slider controls and return to Operation Settings
6 - Online and Offline and FAQ

During an operation PoLo only needs an Internet connection to enable spotting, and to pull contact data from qrz.com, all other data is stored on your device.
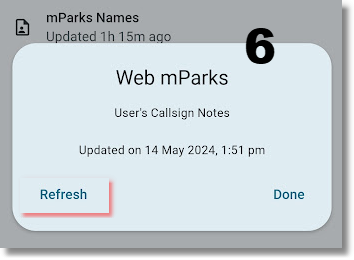
These offline data files, those within the Settings > Offline Data area along with those in Settings Callsign Notes synchronise periodically dependant on how often they might change. Callsign Notes update daily; the well established programmes such as SOTA update every 3 months or so, but POTA and WWFF are set to update monthly due to their possibilty of expanding as more sites are included within those programmes.
Each of these data sets can be refreshed manually by selecting them in the Data Settings area, and tapping Refresh on the pop-up.
7 - Data Lookups
PoLo offers several sources for data both offline and online.
- QRZ Lookup is the primary source of online data and falls into two categories depending on whether you have
- a paid subscripion to QRZ or
- use only the free account provisions. In addition to this source, there is the
- Callsign Notes feature which is data downloaded and avilable offline,
- and also history from both the Operations present on the device and any historical ADIF data you have chosen to import.
- HamDB lookups (free, but US, Canada and Germany only)
QRZ Lookups
QRZ XML data Lookups are available for both free accounts and paid subscription. The data offered by QRZ retrieved during the query to QRZ is, however, different in each case. According to QRZ policy, free accounts provide for 100 lookups per day after which no data will be returned. Additionally, the data provided for free accounts is a subset of the data returned for paid account queries. Your QRZ account details on the qrz.com website will show your Callsign Lookup Activity as total web lookups today, total XML lookups today and your daily maximum limit is also shown. The lowest QRZ subscription level of “XML Data” will provide unlimited XML data lookups.
QRZ Authentication
Please remember that logging into QRZ via the API requires that you use your callsign, NOT your email address. You can use either email address or callsign when logging on to your QRZ account, but only your callsign for the api which is required for lookups.
Addtionally, the QRZ API is known to have problems with passwords with some special characters that might work fine when logging thru the web. If you’re having problems using your credentials in PoLo, please consider changing your password to use only letters, numbers and common symbols.
Use the account Check Credentials link to ensure you have the password correct
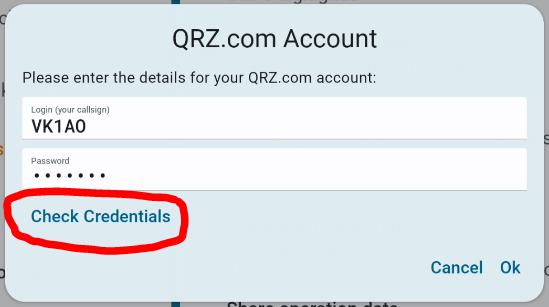
If a login is successful, this link test will change to a tick
Operation Data
Previous Operations may be left on your device and serve as data lookups in the event that no cell coverage is available and no ADIF data has been uploaded to the device. Callsign Notes, if enabled, will always be presented on the callsign entry form when a callsign match is found.
Operation Data also serves to provide statistics with regard to the number of contacts/QSOs made with another operator.
ADIF History
It is also possible to upload an ADIF file to your device to serve as lookup data. In this case, historical lookups are done across all operations plus the ADIF records you have loaded.

Enabling Call History data lookups will use the historic ADIF data imported under Data Settings for data lookups. It will also enable QSO statistics to be calculated from all data (Operations and Historic ADIF imports) and display summaries when both entering/editing QSOs and displayed on the full callsign lookup panel.
Differences in Data returned by QRZ free accounts versus paid subscriptions
The XML data fields returned from a callsign query for free QRZ subscriptions are limited to FirstName, Surname, Address, Country field values only. The raw data return from such a query is show below and includes a Session Message that A subscription is required to access the complete record.
In particular, queries for free subscribers DO NOT include grid locators, which is what PoLo uses to show the QSOs on maps.
<Callsign>
<call>VK1AO</call>
<fname>Alan</fname>
<name>McDonald</name>
<addr2>Yellowtail Way NSW</addr2>
<country>Australia</country>
</Callsign>
<Session>
<Key>8080e595830xxx23939b3fefa049983e</Key>
<Count>3</Count>
<SubExp>non-subscriber</SubExp>
<Message>A subscription is required to access the complete record.</Message>
<GMTime>Sat Aug 10 03:11:55 2024</GMTime>
<Remark>cpu: 0.017s</Remark>
</Session>
</QRZDatabase>
For subscribers to QRZ, the XML data returned is comprehensive and includes the sort after callsign gridsquare and QRZ primary image link. The callsign gridsquare, if returned, will be used in the QSO Map. The veracity of the gridsquare is, of course, subject to whether the OP being queried has recorded accurate data.
<QRZDatabase version="1.36" xmlns="http://xmldata.qrz.com">
<Callsign>
<call>VK1AO</call>
<aliases>4W/VK1AO,VK2MET,AX1AO,VK1O</aliases>
<dxcc>150</dxcc>
<fname>Alan</fname>
<name>McDonald</name>
<addr1>Worimi Country - Yellowtail Way</addr1>
<addr2>CORLETTE NSW</addr2>
<zip>2315</zip>
<country>Australia</country>
<lat>-32.729451</lat>
<lon>152.117641</lon>
<grid>QF67bg</grid>
<ccode>18</ccode>
<land>Australia</land>
<efdate>0000-00-00</efdate>
<expdate>0000-00-00</expdate>
<qslmgr>eQSL, LoTW, HRDLOG.net, ClubLog and OQRS (see below)</qslmgr>
<email>vk2met@meta.com.au</email>
<u_views>12043</u_views>
<bio>55766</bio>
<biodate>2024-07-22 08:47:47</biodate>
<image>https://cdn-xml.qrz.com/o/vk1ao/rd_VK1AO_with_Badges_Alignment_M.png</image>
<imageinfo>337:770:498048</imageinfo>
<moddate>2024-07-31 11:57:02</moddate>
<eqsl>1</eqsl>
<mqsl>0</mqsl>
<cqzone>30</cqzone>
<ituzone>59</ituzone>
<iota>OC-001</iota>
<lotw>1</lotw>
<geoloc>user</geoloc>
<name_fmt>Alan McDonald</name_fmt>
</Callsign>
<Session>
<Key>64772b0a412573xxxd61071d6fac6d19</Key>
<Count>99619</Count>
<SubExp>Mon Apr 21 16:06:43 2025</SubExp>
<GMTime>Sat Aug 10 03:12:19 2024</GMTime>
<Remark>cpu: 0.020s</Remark>
</Session>
</QRZDatabase>
8 - Spotting

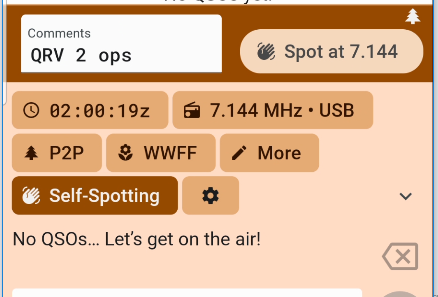
Self Spotting
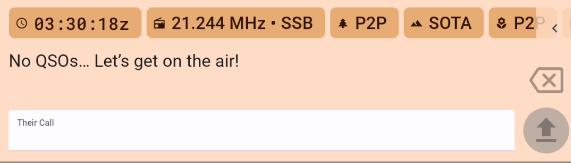
When an operation begins PoLo will enable you to send an activation spot. Reveal the Spotting button using the left pointing arrow in the details area; pressing the button will give you a chance to add a comment to the spot. The spot button will display icons for each of the activities included in the operation that provide self-spotting services.
Re-spotting is done in the same way, with QSY or QRT entered into the Comments window depending on the operators actions.
You can also self-spot by using the SPOTME or just SPME commands in the callsign entry field. You can add a short comment after a /, such as SPME/QRV.
And for the most common uses, you can just use the even shorter commands QRV, QSY and QRT to self-spot with the respective comment. Enter these commands in the “Their Call” field and just send it. There’s no need to open and edit your spot comments in this instance. It saves even more time.
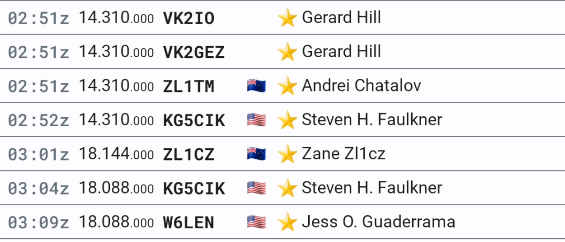
PoLo currently supports receiving spots for POTA, SOTA and WWFF, clicking any spot within the list on the spots tab will put all of that contact’s details into a new slot on the QSO tab enabling quick and easy contact to be made.
Spotting another Operator
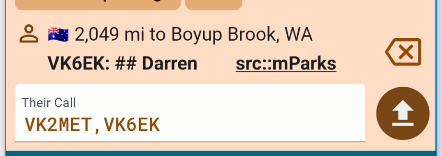
You may often work another portable operator who may not have coverage to spot themselves. PoLo provides two ways to spot other operators. You can either spot them during or after you take their details, or just take their details, spot them and discard the settings.
During or after logging them
Take the details such as park number(s), frequency, mode etc and before you tap Send to save, open the controls panel where you will notice that the “Self-Spotting” button has become “Spotting”. Simply tap this button now to send a spot for the other operator. When the spot is confirmed, save the QSO in the normal way with the “Send” button.

Working and spotting multiple operators is easy as entering the callsigns as a comma-separated list in the “Their Call” entry field. Spotting will then spot both callsigns and subsequent logging will save each as a separate contact. See also Multi-Op Operations for more details
Without logging them
If you have already worked the other station or do not wish to log them them for other reasons, you can just fill in the QSO details as you would normally, then “Spot” them, then just wipe the QSO details.
You may be portable but not specifically activating a site and this “Spot other” action gives you the ability to help out when you have cell coverage and the other OP does not.
Attempting to Spot an existing log entry which is older than 10 minutes will be rejected.
In this case you will need to spot them from a fresh entry in the Their call entry field. You will also need to enter a reference for the spot so it can be spotted in the relevant place e.g.
9 - Mapping Requirements and FAQ
The QSO map is a very popular feature. There are some basic requirements to produce this map:
- Your location,
- The location of the other operator,
- Live/online data lookup (primary) or,
- Offline/Historical data (secondary),
- Edit QSO gridsquares manually in the “More” control.
Your location
To provide the origin of the map, you must supply your location for each operation. If you select a park or summit etc, the location grid will be supplied by PoLo based on the park/summit/activity list. Please note that the grid will be based on the centroid of a park so a trail crossing several state borders may not accurately represent your exact location. In these cases, you should enter a gridsquare that represents your current location. You can use your device’s GPS or enter the grid manually in the Operation Location setting.
In cases where you have chosen to log general QSOs, you must remember to enter your location manually. If no location (gridsquare) is set for your operation then when viewing the map, you will be warned of the missing parameter and prompted to return and set it.

Why do I not see any lines on my QSO map? Most likely because you do not have your own location set for the operation.
The location of the other operator
The other operator may be at their home location, or in a park/summit etc. For operators at their home location, their gridsquare is sourced from either a live/online lookup (refer to Data Lookups in this doumentation), offline or historical data, or the Park2Park or Summit etc gridsquare.
Live/online lookup
The primary source of lookup data at this time is QRZ and/or if active, HamDB lookups (free, but US, Canada and Germany only). As stated elsewhere in this documentation, the details of live data from QRZ is subject to your subscription level. A paid subscription will return the other operator’s gridsquare. Using a free subscription will not return this data.
In the case of a missing gridsquare e.g. using a free subscription and a chaser at their home QTH, their location will be based on the ability of PoLo to interpret the callsign location. The location may be the centre of the operator’s country only, or in some cases a state of the operator’s country.
Why do all the lines on my map go to one place, in the centre of the country? The most likely reason is because you are limited to a free QRZ subscription and operator gridsquares are not available. Country centroids may be used in this case.
Why do all the lines on my map go to the centre of each US state? The most likely reason is because you are limited to a free QRZ subscription and operator gridsquares are not available. Where possible, PoLo will place the location according to a lookup in Big.cty file. Vanity callsigns which are not be present in the big.cty file will be placed in the centre of the 48 States.
Why are some QSO lines missing? Again, the most likely reason is because you are limited to a free QRZ subscription and operator gridsquares are not available. Country centroids may be used in this case. So several contacts may be drawn to the same location and appear as if they are missing.
This can also happen even if you do have a paid QRZ account and you work more than one person in the same gridsquare. In this case, the dots may be drawn on top of one another and appear as if some lines or dots are missing.
Additionally, if you edit a QSO from the “More” control and change or enter a grdsquare of your choosing, the map will use this gridsquare on the map.
Offline/Historical Data
The secondary source of lookup data for your QSOs is historical data. You may, if you wish import an ADIF file of previous QSOs (your amateur radio log file). If this data is available, it will be used where other sources of data are not available.
Of course, if your historical data is all subject to a free QRZ subscription, operators’ gridsquares will be missing. Gridsquares may be present as sourced from digital modes such as FT8. But in the main, your hisitorical data in this instance may only be able to provide name and address information as per Data Lookups.
Edit a QSO gridsquare
If all else fails, you can edit a QSO’s gridsquare manually by entering the “More” control where numerous other fields are editable. Change or edit the gridsquare to one that is more accurate.
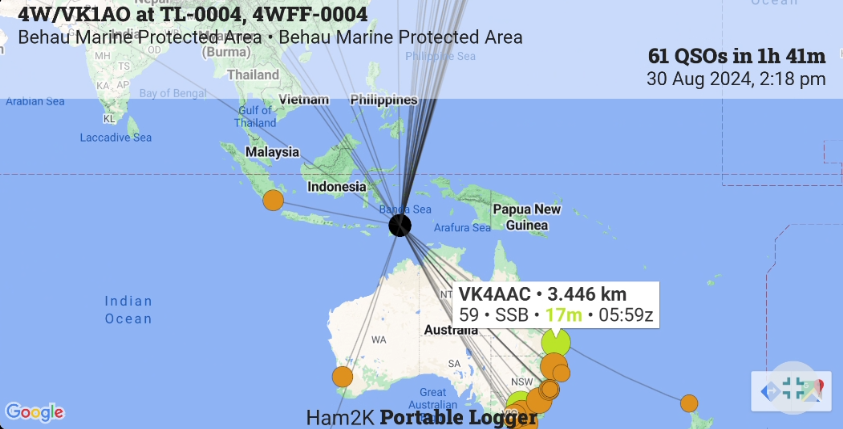
The Map
If the above data is available, the map can be produced with your location centred. QSO lines are drawn for your contacts based on the level of data available and the map dots are coloured based on the band used for each contact. Clicking on a dot will reveal the QSO details.
10 - Operations with more than one Operator
PoLo provides for a single logging operation where more than one Operator is activating, so one person can do the logging for both operators. On completion of the activation, separate logs will be generated for each Operator. There is no need to duplicate a single log and edit the contents for the second operator.
Setup
After creating the operation and adding whatever activities are applicable, you can edit the Station & Operator settings to reflect the callsigns of the operators who are handing the microphone around. The callsigns are entered as a comma separated list in the Station Callsign field.
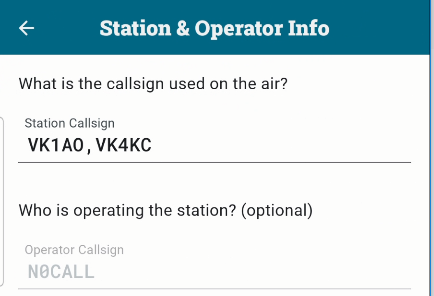
Continue to log the calls as you would for a normal single operator operation/activation. The heading for the operation will indicate the number of operators.

Self Spotting
When you spot with this setup, the default spot comment includes “2 ops” in the comment. Two spots will be created - one for each operator. This allows for non-PoLo environments to see both of you.
Polo Spots has the ability to consolidate spots from the same park on the same frequency. In cases like this, for other PoLo users, tapping on the spot for a multi-op activation will result in a log entry with both callsigns in the “Their Call” entry field. You can just confirm the callsigns and send them for 2 entries to be created in your log, one for each operator on the other end.
Finalising/Exporting the logs
When you finish the operation, it’s time to export the logs. This time, however, you will be offered the export of logs for each Operator in the comma separated list as separate logs.
Future Template
Once this operation is present on your device, the setup will be offered as a an Operation Template. So for future operations with the same buddy, you can just choose the template to get the Station & Operator settings.
11 - Satellite Operations
Enabling a Satellite Operation
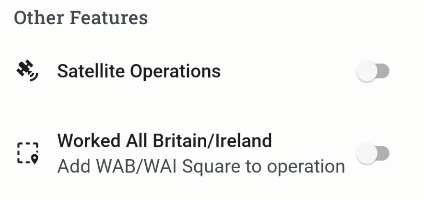
Scroll down on the App Features tab to find “Other Features”. Enable Satellite Operations.
Next, create a New Operation and in the Activities section, add Satellite Operations.
Next go to the QSO tab of the Operation and open the “More Controls” section. Tap the Sats control to bring the satellite list into view for the operation.
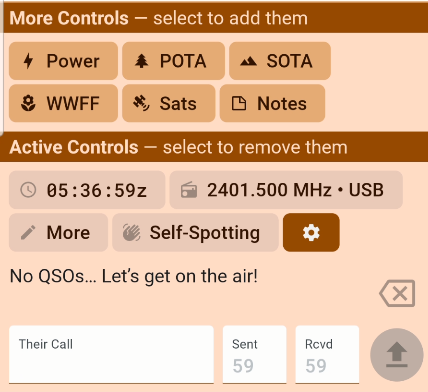
Selecting the Stats button will provide a drop-down list of the satellites currently available in PoLo, select the one you are working. It should bring the frequencies into view for that satellite.
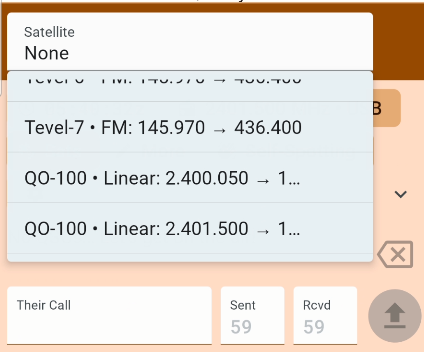
Ensure that the satellite you are selecting is visibly selected in the control panel.
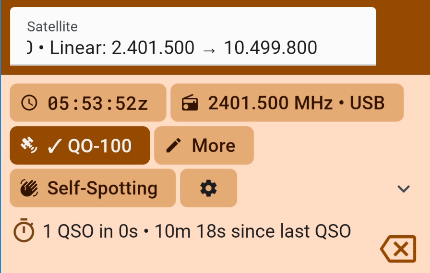
The export feature will export all fields associated with these satellite contacts.
The list of satellites available for selection within PoLo can be found here.
If you are aware of a satellite missing from this list you are highly encouraged to make edits and additions to the file for yourself and the benefit of others. It’s as simple as creating a GitHub login if you do not already have one, then making the edits following the form shown in other entriese. Don’t be frightened or hesitate… you cannot make a mistake or break anything. Any formatting issues can be corrected in the Pull Request Approval process. You may also leave a message on the PoLo support forums
12 - Callsign Expansion
The Callsign Notes file can be used to store and retrieve multiple callsign lists from a shortcut stored in the file.
Callsign Shortcuts/Abbreviations
A typical Callsign Notes file entry will look like this:
VK1AO Alan
VK4KC Marty
KI2D Sebastián
# etc
For each callsign entered, the accompanying name will be displayed as a note, but the callsign will be in the “Their Call” ready for sending (saving).
When an entry is made with 2 leading dots (or slashes) and the note file entry is formatted with a comma separated list instead of a single name entry, the list of callsigns are expanded and entered into the “Their Call” entry field ready for confirmation and saving.
1AO VK1AO,VK2MET
4KC VK4KC,VK4MAD,VK4DOG
1RF VK1RF,VK2MK, VK4CEE
# etc
So by entering ..1RF or //1RF the prompt becomes:
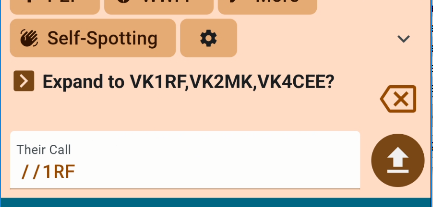
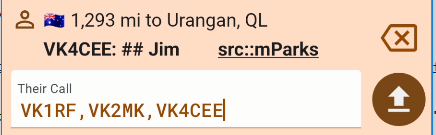
The first tap of the send button will drop the expanded list into “Their Call” where you may edit, add or remove a callsign to confirm. The second tap of the send button will submit the list of callsigns into your operation as separate QSOs.
13 - Callsign Stacking
Everyone will have their favourite way to handle a pileup. For those who like the callsign fragment method i.e. one where you might scribble down callsign fragments and then back track to each fragment in the list one at a time, then Callsign Stacking may be of interest.
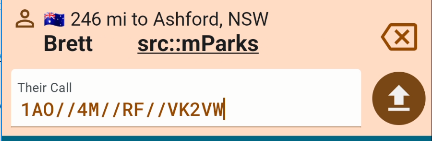
In the “Their Call” entry field, enter each fragment that is heard separated by double slashes or two dots which will be converted to slashes.
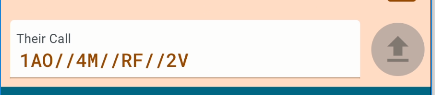
Then work backwards through the stack, correcting each call until confirmed. Once confirmed, send the corrected call to your log.
Sending a complete call will remove it from the stack and leave the stack ready for correcting the next partial/fragment.
Continue until all fragments are corrected and submittted.
Watch this video for a live demonstration.

For more videos, check out the Ham2K YouTube channel
14 - Callsign Notes
“Callsign Notes” is a feature that allows you to show short notes for specific callsigns in the logging screen. This can be useful to remember the name of a friend, or to know if a station is a member of a club or a special event station.
PoLo comes with a built-in file, called “Ham2K’s Hams of Note”, but you can add as many additional files as you want, and enable and disable them as needed.
The built-in Notes include emojis such as 🧑💻, 👷, 📺, 💻, 🌳 and others, so if you see one in the logs somewhere, this is where they come from.
Custom Files
Custom callsign notes are stored as simple text files, one call per line followed by information you wish to show in the logging screen.
If the information starts with an emoji, it will be shown in log and spotting entries.
Empty lines, and lines that start with # are ignored.
File Format
An example of the simplest format used for the file would be:
VK1AO Alan
VK4KC Marty
KI2D Sebastián
# etc
The file also supports simplified markdown tags similar to the ones used on GitHub. So you may supply hyperlinks and text formatting which is then used by PoLo to display the text.
File storage and access
Once this file is created, you may place the file in your favourite cloud storage folder and copy the public link for the file to be installed into PoLo.
The URL you provide must be a direct link to the file in plain text, and not a link to a web page that contains the file as it’s often the case for file sharing tools and cloud storage services.
However, PoLo knows how to handle some cloud storage services, and can automatically convert the link to a direct link. This is currently supported for Dropbox, OneDrive, Google Drive and Google Docs.
Step 1:
In the application Settings, tap Data Settings.
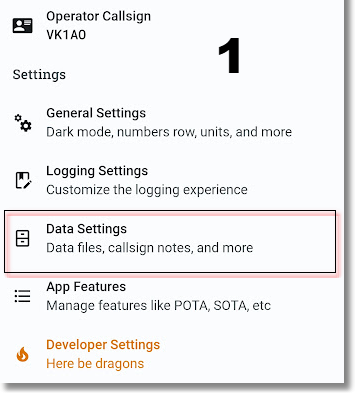
Step 2:
In the Data Settings, tap Callsign Notes

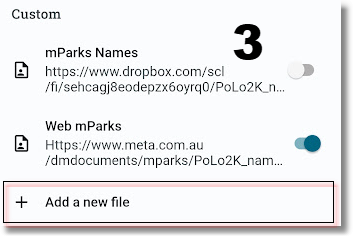
Step 3:
In the Callsign Notes page, click on + Add a new file then give the file a name and copy the url into the Location field. Activate the file with the slider control.
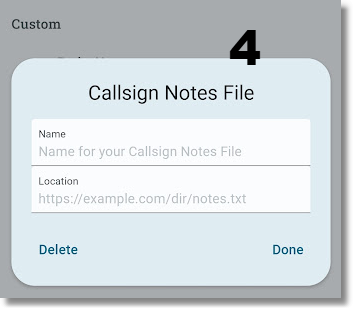
Step 4:
In the Custom window, provide a name for your files and paste the url for the file into the Location field. The resource provided from a Cloud service must be granted public access or shared with everyone.
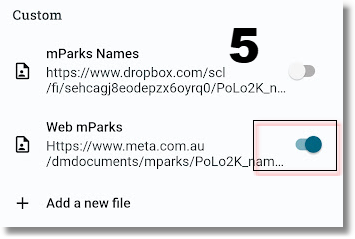
Step 5:
Click Done to return to the Callsign Notes, then enable the file you have added by using the slider control
Step 6:
From this point, you may return to the Offline Data page and click on the file name so you can Refresh the file. This action will pull the file onto the device. The date and time of the last update is shown in this dialog so future refresh actions can be managed as your wish. Click Done.
Watch this video for a live demonstration.

For more videos, check out the Ham2K YouTube channel
15 - Emojis
Every now and then you will see an emoji within the Callsign Info Panel, for example if you enter KI2D you'll get the following: 🤩 Sebastián - Ham2K PoLo Creator.
You can expect to see any of the following, and some others too:
🧑💻 - Ham2K PoLo contributor
👷 - Ham2K Test Crew
📺 - YouTuber
💻 - Software developer
In addition, it’s possible to add your own list of callsigns with details (and emojis) using the Settings > Data Settings > Custom Callsign Notes option. You can link to your offsite list which could include POTA friends, fellow club members etc.
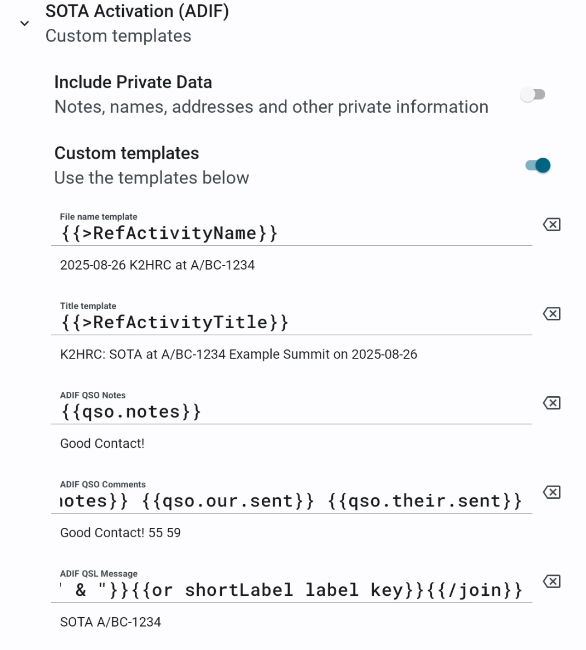
16 - Export Templates

Filenames
Each operation activity has a default filename convention which is based on tradition or specification from each activity. For example, WWFF log filenames are typically formatted as CALLSIGN@PARKID YYYYMMDD.ADI while POTA log filenames are formatted as CALLSIGN@PARKID-YYYYMMDD.adi.
But these names can be modified to suit your own filing habits if needed. In reality, POTA filenames can be anything you like as long it contains legal filenaming characters. The log uploader will attempt to recognise the park name and location from the PARKID in the filename, if it’s missing you will be prompted to supply it before processing can be done.
To this end, PoLo offers a way to customise the export log filename to something you prefer in lieu of the default.
Under General Settings, you will find Export Settings.
Export Field Values
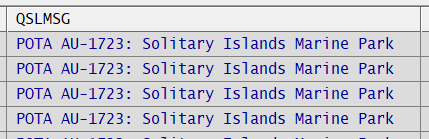
Most field values are set during a QSO and are required for QSL purposes, e.g. callsign, mode date/time etc. But some may be used for personal comments or notes and may also be used in personalising QSL information e.g. the ADIF QSLMSG field.
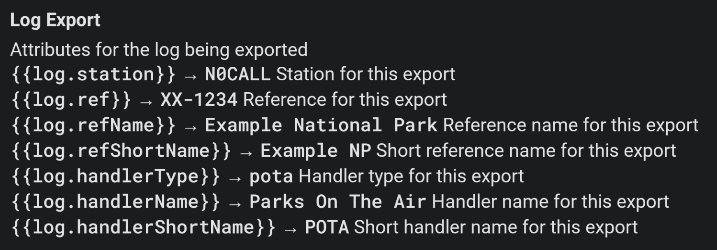
At this time, it is possible to customise the ADIF QSO Notes, QSO Comments and QSL Message field values. The default customised QSL Message value is:
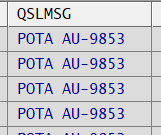
{{#join op.refs separator=", " final=" & "}}{{or shortLabel label key}}{{/join}}
This is read as: concatenate (join) the operation references separated by commas then add an ampersand before the last reference using the shortLabel and will produce a QSL Message for each POTA log like this:
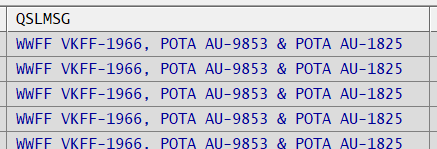
of for the full log like this
Using this instead
{{#join op.refs separator=", " final=" & "}}{{or longLabel label key}}{{/join}}
will produce a QSL Message with the long reference name like this
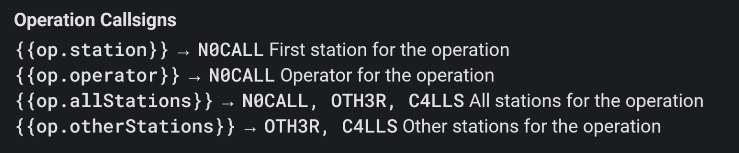
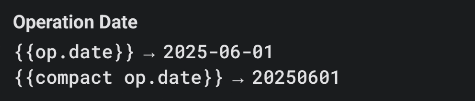
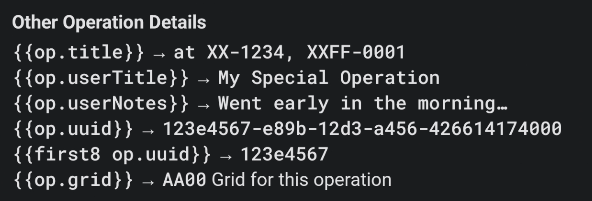
Some further field values for use in the export log fields are:
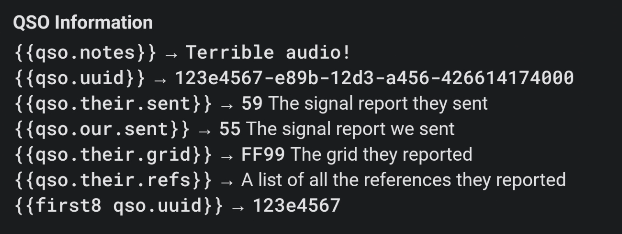
Popular SOTA template for Signal Reports
A popular addtition to the Custom template used by SOTA activators is to Enable Custom Templates for SOTA Activation (ADIF) and add {{qso.our.sent}} {{qso.their.sent}} to QSO Comments field so the field says
17 - Developer Mode
WARNING: Using Developer Mode features can increase the chances of crashes and data loss. Use with caution.
To enable Developer Mode, start a new operation, or open an existing one, type KONAMI in the callsign input field, and press the [Send] key (or [RETURN] or [ENTER]) in your keyboard.
You should see a short message confirming that the mode is now enabled.
You can use this same procedure to toggle it off.
You will now find new features and options in the app, usually highlighted in an orange color.
Developer Mode Features
Unstable Versions
In the Deverloper Settings you can now select between three different “update channels”:
- Stable: The default channel, with the most stable and tested versions.
- Unstable: The latest versions, with new features and bug fixes, but not as well tested.
- Bleeding Edge: Work in progress, with the newest features and bug fixes, but also the most likely to have issues.
After changing channels, you should use the option to “Check for new versions” to download the latest version from the selected channel.
Raw Data Export and Import
In Developer Mode you can now export and import raw data files used by PoLo, in the “QSON” data format used internally by the app.
You can export an operation in the Operation Settings tab. And you can import a QSON file as a new operation from the main Developer Settings screen.
Database Management
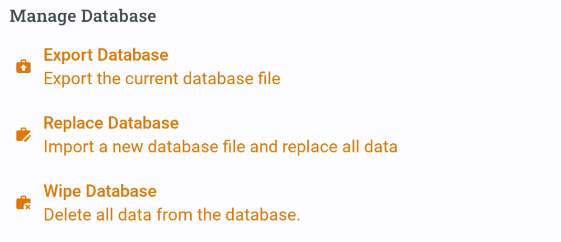
Enabling the Developer Mode provides for a way to backup the entire database or Wipe all the data from it. Typically, however, this provides a way to move your data from one device to another e.g. when you get a new device. Furture version of PoLo will provide a data syncing service, but this developer mode action can be carried out quite effectively. It can also provde a way to change your preferred device from time to time but keep all your data available on your chosen device.
Exporting the database to a cloud serivce of your choice is the easiest way to handle the database move. Then choosing Replace Database on the other device will allow selection of the new database. This is NOT a merge function. All data on the device being replaced will be lost and replaced by the select database from the previous export function.
18 - Log Exports & Privacy
Privacy Regulations
Data privacy regulations are laws that govern how organizations collect, use, store, and share personal data. These regulations aim to protect individuals’ rights and ensure that their personal information is handled responsibly and securely. Key regulations include the General Data Protection Regulation (GDPR) in the European Union, the California Consumer Privacy Act (CCPA) in the United States, and the Privacy Act 1988 in Australia.
Data lookups and your rights
Many of us provide personal data to places like QRZ to enhance our experience in Amateur Radio and inform our contact partners of our QTH location etc.
With any form of subscription to lookup services, it is intended that other people’s data you lookup and store locally stays with you locally and does not get propagated again and again throughout the internet onto a myriad of servces and systems.
Portable operations normally involve uploading of data which reflects the contacts made and provides enough information to confirm or QSL the contact. The data is uploaded to QSL services such as LOTW, eQSL, POTA, SOTA etc.
But the minimum data required to make the QSL is relatively impersonal and does not need counterparty names, addresses, email addresses etc.
For this reason, PoLo provides specific exports designed for the upload to QSL services and separate export files which may contain personal data intended for merging into your own personal database/logging syste.

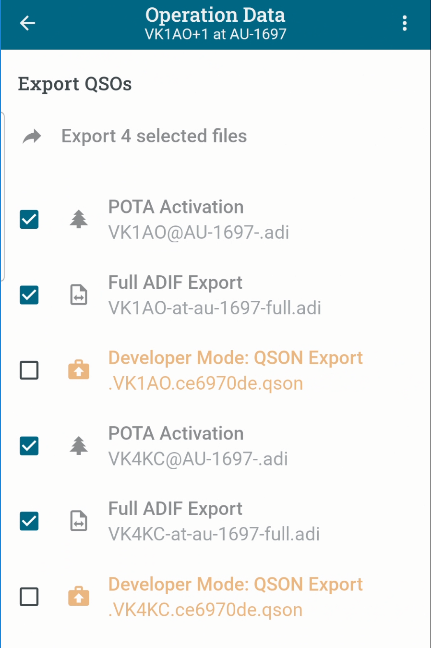
Activities versus Full exports
The example shown here of export options for an operation of a WWFF park and a 2-fer POTA park activation shows that several export logs can be generated. Each log is specific for its intended upload QSL service. Two POTA logs for the two parks, one WWFF log for the paired WWFF park. And during the operation, a SOTA summit was contacted so a log is generated just for those contacts.
Each of the specific logs contain the minimum data required for the associated QSL service. No personal data is included by default.
Finally there is a Full ADIF Export which does contain all the data form the operation including personal lookup data and personal notes made by you on each QSO. This export is designed for import into your favourite logging software. It is, by design, not intended to pass on to 3rd parties becuase it contains data defined as private.
PoLo supports these measures and recommends that you use each export log for their intended purpose.
Overrides
If you must, there is an override to this default behaviour.

In General Settings|Export Settings, it is possible to enable the “Include Private Data” option. This option will cause the chosen export file to include the personal data of each QSO operator.
Please use this option with caution. Personal lookup data is, of course, subject to the lookup options you have enabled and subscribed to elsewhere in PoLo and also to the data you manually enter into the “More” tab of the QSOs in question. Remember that once you pass on someone’s personal data, you and they no longer have control over who else can obtain it. Habits which protect other people’s data will also therefore, protect your own.
19 - Tips and Tricks
Shortcut Commands entered in the Callsign Input Field (labelled “Their Call”)
When you are in the callsign input field, you can use the following shortcuts, always followed by the [Send] key or button on the screen:
-
Enter a band or mode to change the current band or mode. For example
20morCW. -
Enter a frequency to change the current frequency (and band). For example
14.070or14070. -
Enter a power level to change the current power level. For example
5Wor100W. -
Enter a new decimal frequency to change just part of the current frequency. For example, if you are on
14.245and you type.247, the frequency will change to14.247. -
Enter a time or date to change the QSO time. For example
14:30or14:30:25for time, or05-09for May 9th. -
Enter a time difference to change the QSO time. For example, if you are logging a QSO at
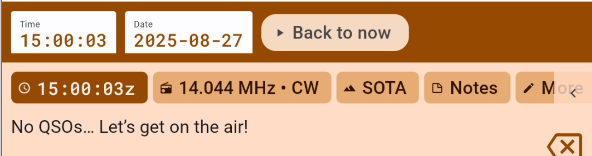
14:30and you type+15m, the time will change to14:45. If you type-1h, the time will change to13:30. You can usehfor hours,mfor minutes, andsfor seconds, as well asdfor days andwfor weeks. See also “Back to Now” in Post Logging below. -
Enter
QRV,QSY, orQRTto self-spot with the respective comment. EnterSPOTMEorSPMEto self-spot with current frequency and mode but no comments. -
Change operators with
OPER/orOP/followed by the new operator’s callsign. -
Enter
KONAMIto enable or disable Developer Mode.
Smart Data Entry
See the Call Stacking section for handling pile-ups.
In most activation reference fields (POTA, SOTA, etc) you only need to enter letters and number, and PoLo will automatically fill in any dashes and slashes. And in many cases you can skip the prefix too and PoLo will guess it from the callsign.
So for a POTA Park-to-Park contact with, say, LB4FH in NO-2518, you can just enter 2518 and PoLo will fill in the rest.
For SOTA reference VK1/AC-001, all you need is to enter VK1AC001.
Quick field selection
Use the [space] key to quickly select the next field in the form. This is especially useful when you are logging a lot of contacts and want to keep your hands on the keyboard.
Also, if the report is just 59, you can leave the field empty.
Some keyboards also support using the [tab] key to move to the next field, but this can be less reliable. We’re working on
expanding this to more keyboards, but iOS and Android make it harder to deal with these keys than desktop operating systems.
Multiple QSOs at once
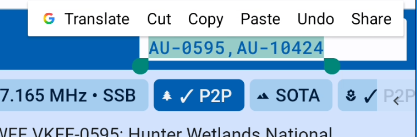
You can use commas to enter more than one callsign at a time and PoLo will log them as separate QSOs. This is useful, for example, when you log a POTA Park-to-park contact with multiple operators on the other end.
This also works when editing existing QSOs if you want to duplicate the information for another operator.
Smart Slash
Most phone and tablet keyboards make it hard to enter a slash (/) character, which is often needed when logging callsigns like WV3H/VE or VK1AO/P. A period (.) can be used instead and PoLo will convert it to a slash.
Bearing and distance
Entering your qrz.com credentials in Settings > Accounts > QRZ will enable PoLo to provide details of contacts you make. If you have a qrz.com subscription it will also provide bearing and distance information to your contact.
Post Logging
Entering logs into PoLo from paper logs may be assisted by these quick entry commands. Using the callsign entry field:
- Type
14:55to change the time. This also pauses the clock until you tap on the time and tap “Back to now” - Type
-1mor+3mto adjust the time back one or forward 3 minutes. - Type
-1dor+3dto adjust the days back one or forward 3 days. - Type
7200or7.200to set the frequency. - Type
20mto set the band - where no exact frequency is desired. - Type
CWorSSBto set the mode.
Consecutive entries will advance the QSO time by 1 minute per entry, you may wish to adjust back or forward when you move more than a few minutes away from your written log entries.
When you have finished logging your entries, you can return the timer back to the current time by tapping the time and then the “Back to Now” button
Frequency and Reference editing
Editing/correcting a frequency after a callsign has been entered can be achieved by tapping into the frequency box, backspacing out the entered frequency and re-entering the correct/desired frequency. Let’s not forget that a quicker way to correct a frequency, avoiding multiple taps on the backspace, can be achieved by a tap and hold on the frequency.
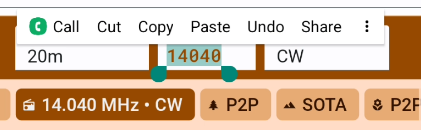
Once the field value is seleced, typing a new frequency will wipe the old and replace with a new value. The same can be achieved in other fields such as the reference fields.
The tap and hold action can also be achieved by 3 quick taps to select the entire field value.